At August 13, 2015 , Samsung held a new conference in the United States 2015 Lincoln Center , two flagship products have been released that day- Samsung Galaxy Note 5 and Galaxy S6 edge +. As the main products of Samsung , the eye-catching Samsung Galaxy Note 5 improves in many factors, for instant, it is ablaze with slim, shiny, large-screened luster, retooled stylus, removable battery and better expandable storage slot etc. The 5.7 inch Samsung Galaxy Note 5 is on sale now, if you need to switch to a new Samsung phone, galaxy note 5 indeed a good choice. But before doing this, don’t forget to backup your old data on Samsung.
Though, the new note 5 has great functions, it is good to take card of the files on Samsung galaxy note 5 while experiencing its amazing features. If by any chance that you accidentally delete some important files that you didn’t mean to, or lost files during rooting/updating/transferring, don’t get too tensed though. The following guide tells a detailed way to recover deleted/lost files from Samsung galaxy note 5 even without needing of backup files. Check it out.
About Samsung Galaxy Note 5 Data Recovery
Before doing the galaxy note 5 data recovery, a crucial tool I'd like to mention: Android Data Recovery. This is software empowers to recover data from any android device including galaxy note 5, note 4, note 3, galaxy s6, s6 edge, s6 edge + , s7, s7 edge, s8, s8 +, etc. With it, it is easy to retrieve deleted text messages, contacts, call history, WhatsApp messages/attachments, videos, photos, audio files from galaxy note 5’s internal memory and external SD card.
Attention:
You are advised stop using the galaxy note 5 once you noticed the data lost, as the lost files could be overwritten by new content, which make the files unrecoverable.
Steps to Recover Data from Galaxy Note 5
A, Download, install and run the galaxy note 5 data recovery tool on your computer.(for mac users, download android data recovery for mac)
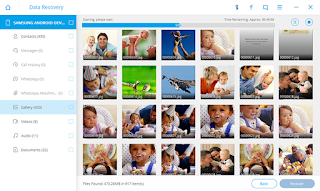
B, Plug USB into Samsung galaxy note 5, then to computer. Then select specified content to scan. For example, if you just need to recover photos from galaxy note 5, simple choose “Gallery” to save the scan time. Or tap “All” to continue.
C, After the note 5 is detected by computer, it will automatically pop up a message to guide you enable USB debugging. Follow its wizard to do this, so that the program can access to the lost files on your galaxy note 5.
D, When this program identify your device, you will go to a new window, simple tap “Start” button to scan data. It may take a while for the scanning.
E, After the scan finishes, you can check the recoverable files one by one. Mark the wanted files to recover and save them to computer. That's it.

Just download and take this reliable note 5 data recovery tool in this high time. Actually recovering files from galaxy note 5 is just a fraction of the full capabilities of the software. Want to know more about Samsung data recovery? Feel free to make a comment below.
Related Articles:
Sometimes, the android users may have encountered hardware or software issues like phone screen broken, the touch screen not working, and you cannot access the valuable data. If you’ve cracked your android phone and the screen was broken, and you are urgent to recover the data from the broken screen android phone, then, this article should help you somewhat.
Recover Existing/Deleted Files from Android with Broken Screen
Files like contacts, SMS, call logs, whatsapp messages/attachments, viber messages etc. are hard to manually copied/recovered from an android phone, not to mention the android phone with broken screen. The following method offers a feasible solution to recover contacts etc. from broken screen android phone with ease.
What you'll need:
-Android Debug Bridge. You may need to unlock your android phone with dead screen firstly. The Android Debug Bridge is a good tool to do this. (You can also refer to this article to unlock your android: http://joyofandroid.com/unlock-android-device-with-dead-screen/)
- USB cable and USB Mouse. Though, on some of android phones, mass storage mode is automatically activated, if not, an USB mouse is needed to make the phone connected to computer.
- Yolisoft Android Data Recovery Program. This tool is used to copy/transfer/recover deleted/lost data including contacts, messages, call history, whatsapp, photos, videos, music etc. from android phone internal memory on computer.


Detailed steps:
- Unlock android and connect android phone to computer with USB cable and USB mouse.
- Launch Android Phone Recovery and select wanted files to scan.
- Using USB mouse to enable USB debugging on android. After the device is detected, click “Start” to continue.
- Wait for a while for the scanning process. When the scan completes, you are allowed to preview both existing and lost files. Tap “Recover” to save them to your computer.
Recover Multimedia Files Like Pictures, Videos, Music from Broken Android Phone
If you just want to recover multimedia files(pictures, videos, audio
files), then you can recover data from android without android phone recovery tool. After you unlocked the screen and connect the android
device to computer with USB mouse and cable. Simply navigate to the
Autoplay popup -> click “Open folder to view files” option. Your
phone's internal memory should now be accessible, then copy and save the
files from the internal storage to your PC. That's it.
Notes & Tips:
If you just want to copy and backup the existing files stored on your phone, you can use Phone Data Transfer instead of android phone recovery program do this job.It is wise to regularly backing up your android phone to avoid any unnecessary data loss.
Related Articles:
This is a guide about how to recover deleted/lost pictures, videos from nexus phones/tablets, including Samsung Galaxy nexus, Google Nexus, Nexus 10, Nexus 7, Nexus 5, Nexus 4. If you are a Nexus user who accidentally lost files on your nexus device, then this post is what you are looking for.
What reasons cause to data loss, the photos can be recovered?
There are many reasons could cause the data loss, such as, you mistakenly click the “Deletion” button and important files like photos lost in seconds; you may factory reset/format your nexus device which you didn’t mean to, everything just gone; your phone/tablet is attacked by unknown virus someday, the important files lost; the phone stuck/freeze when you are rooting/updating/transferring; or you just cannot find your files and they lost even without realizing it.
If you lost data due to the reasons mentioned above, I’m glad to tell you it is possible to get back the lost photos, videos from nexus with a reliable nexus photo recovery tool as long as the files haven’t been overwritten. One of prerequisites for the recovery is that your device must be connected/identified by computer at least. In other words, if your device is physical damaged/water damaged, or disconnected, it cannot restored by this way. It is good to send your device to be repaired.
About Nexus Photo Recovery Tool:
Well, to start with, a Nexus photo recovery tool I’d like to mention is named Yolisoft Android Data Recovery (Android Data Recovery for Mac). It is a great software to recover photos, videos, sms, contacts, call logs, viber messages, whatsapp messages/attachments, music and more from any android devices like Google nexus, Samsung Galaxy nexus, as well as Huawei, HTC, LG, Motorola etc.
Easy Steps to Recover Photos, Videos from Nexus Devices
Step 1. Don’t use your nexus device once you noticed the photo, videos lost. This could avoid the lost files be overwritten by new content and the overwriting data is unrecoverable by any powerful nexus data recovery tools. In the meantime, you’d better turn off the 3G/4G/Wi-Fi connection to avoid this.
Step 2. Connect nexus device to PC/Mac and make the device accessible. An usable USB cable is needed. To let the program access your nexus, please enable developer options(enable USB debugging)
Step 3. Run the software and select files to scan. You can simply choose the file type you need to continue. After the program identify, click “Start”.
Step 4. Scan, preview and recover photos on nexus. In this progress, you may need to wait for a while for the scanning. When it is done, you can preview the found photos/videos to check its quality. If you are satisfied with the result, select the wanted files and tap “Recover” to save them on your computer.
Related Articles:
Motorola phones are well known as “high-quality”, “low-cost” moibles these years, especially the moto G and moto X series. Needless to say, the Motorola mobiles are great for young people. In this digital world, almost all younger having a smartphone to keep their precious files, like beautiful videos, photos, amazing musics, important contacts, text messages, call logs and more. However, we have received many letters from our customers -Motorola users, complaining that they accidentally lost/deleted files from their phones. It is indeed a little hard to restore files on Motorola if you don’t have any backups. Don’t worry, this post is going to tell you guys how to directly recover deleted files from Motorola phones like moto X, moto G, Atrix, droid, razr etc.
To start with, you need to get a useful Moto data recovery tool named Yolisoft Android Data Recovery to help you to do the job. You can free download its trail versions, both windows version and mac version are available. This program is designed to retrieve data from any android devices including the Motorola phones/tablets. You can simple recover contacts, sms, call history, whatsapp messages and attachments, videos, pictures, audio files etc. on Motorola mobiles in 3 simple steps: device connect to pc -> select file to scan-> preview and recover.
Well, let's get started to the detailed steps:
Step 1. Connect Motorola device to computer.
After you downloaded and installed the program, connect your device to your PC/Mac with USB cable, and run the software. (Note: to make your motorola accessible, enable developer options before connecting it to computer. So that the motorola data recovery tool is able to identify and access lost files on your device)
Step 2. Select Specified File to Scan.
When you launched the program, you will see the screenshot as the below picture shows. If you want to recover multimedia files like photos, videos, audio files, just tap the corresponding panel to continue, and so on. Then click “Start” to begin scanning.
Step 3. Preview and restore files on Motorola.
The scanning process may take for a while, which depending on the size and type of the files it scans. When it is done, you are allowed to view the recoverable data one by one to verify the scan result. You can decide if you need to make the payment for recovering the founded file to your computer. If you are satisfied with the result, click “Recover” button to get them back.
That's it. Lost Motorola files are brought back with only 3 simple steps. Very easy, isn't it? Try it yourself.
Useful Tips & Notes:
- The Android Recovery software can only works on recovering Motorola files that haven’t been overwritten by new data. Therefore, to restore data as much as possible, you should use your device as less as possible to avoid data overwriting.
- Regularly backing up your motorola device is the first step to keep your important files safe(You can try android phone manager, Titanium Backup etc. Android backup apps). In that way, you will save not only the money for paying recovery tools, but also save your more precious time and energy.
Related Articles:
What is Samsung factory reset:
Samsung factory reset is a feature that erase all data like user info, application settings, associated app data, account settings, contacts, messages, call history, WhatsApp, photos, videos, musics saved on Samsung phone internal storage. When you perform factory reset your Samsung device, its condition will be in when shipped from the factory and files will gone.
Why you have to factory reset Samsung:
There are many reasons that a Samsung device may need to do a factory reset:
- Too many apps loading slowly(with loading issues), then you may need factory reset your Samsung phone for better performance.
- A freezing phone that cannot do anything on it.
- You may need to sale the old Samsung phone/tablet, factory reset Samsung before selling to keep your private info safe.
How to Recover Contacts After Factory Reset Samsung
Let’s get down to the main topic of recovering contacts after factory reset Samsung. As we all know, contacts are stored on phone internal memory, it is not easy to do backup. Sometimes, you may just tap the wrong button and factory reset Samsung accidentally with no backups available. How to directly restore contacts after factory reset Samsung galaxy s3/s4/s5/s6/s6 edge? Here I’d like to recommend you to use a powerful samsung contacts recovery tool named Yolisoft Android Data Recovery. It is dedicated to restore lost data on android device like Samsung as long as the lost files not be overwritten. Follow the steps below to get the lost contacts back.
Step 1. Plug Samsung device to computer.
Firstly, download and install Yolisoft Android Data Recovery (android data recovery for mac) on your PC/Mac. Then connect the device to computer with USB cable and run the software.
Step 2. Select file to scan and let your Samsung can be accessed
Select option“ Contacts” to continue. after Android phone recovery detects your phone/tablet, click ‘Start” to scan contacts.
Note: The program can only recover contacts from rooted Samsung device, you need to root Samsung and enable usb debugging to access.
Step 3. Preview and restore contacts on Samsung
After the scanning process is done, all the recoverable contacts will be listed on scanning result, you can click one by one to check and read them. Tap “Recover” button to save the contacts to your computer.
Tip: The above steps only shows the way to recover contacts after factory Samsung, actually, android recovery can do more than that, it allows to recover photos, text messages, whatsApp, videos, musics etc. from Samsung after factory reset.
Related Articles:
Like any other smart phones, you may accidentally lose the access to the galaxy s6 or s6 edge, for example, the mobile lost/stolen, phone damaged/messed up, or you just mistakenly delete some important files(sms, contacts, photos, call logs, etc.), even worse, sometimes the precious data lost without realizing it. To avoid the disaster, you may need to backup & restore galaxy s6/s6 edge. In this way, you can get some files back from the backup at least.
This post gives solutions to recover and backup data from Galaxy s6,s6 edge with ease. Read on the detailed steps:
Part 1. Transfer, Backup and Restore Files from Galaxy S6 to PC/Mac with Smart switch
Thanks to the great data transfer and backup application developed by Samsung - Smart switch. It offers the best solution to backup and transfer contacts, photos, music, videos, messages, notes, memos, calendars and more between Samsung to PC or mac.
Step 1. Get Samsung Smart switch from www.samsung.com/
You can download the desktop version(Mac/Windows) and mobile version as your own choice. The following steps is based on the desktop one.
Step 2. Start Samsung Smart Switch on Computer.
After you have downloaded the program, simply follow its installation wizard to install it on your pc/mac. Then double click its icon on desktop to launch it.
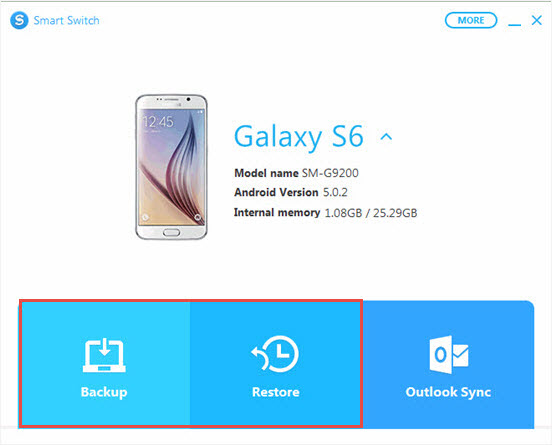
Step 3. Backup/Restore Files on Galaxy S6, S6 Edge.
As the screenshot you can see, when the software is started, 3 options is available for you to choose - “Backup”, “Restore”, “Outlook Sync”. You can click the corresponding option to do the Samsung galaxy s6 backup or restore.
Part 2. Backup and Restore S6, S6 Edge with Samsung Backup App like Phone Data Transfer
In this part, a great Samsung smart switch alternative is recommended which named Yolisoft Phone Data Transfer. It performs well on backing up and recovering lost files on Samsung Galaxy S6, S6 edge. This tool is powerful enough to backup contacts, sms, photos, audios, videos, as well as apps and WhatsApp messages. Here is the detailed guide:

Step 1. Get the Phone Data Transfer
The program has two desktop versions: Mac version and Windows version. You can download the one you need. Also, you can get the tool at popular download site like cnet and softonic.
Step 2. Run Phone Data Transfer.
Connect your Galaxy S6/S6 edge to PC/Mac, then run it to get started. On the new window, click “Backup Your Phone” panel. (Note: if you have backed up your phone with this program before and need to restore data, then click “from backup” on the right tab to continue)
Step 3. Select the content to Backup/Restore
After you phone identified by the program, the “Start Scan” tab will be clickable. Select the specified files and click the blue button. When the process is done, you will get a pop-up message.
Related Articles:
Dear Software,
I was attempting to transfer nearly 2,500 photos from my Galaxy s6 to my PC. Rather than move everything at once, I would download about 100 photos at a time, save them on my computer, delete them from the phone, and go on to the next batch.
During one of these "deletes," ALL of my photos were somehow deleted from the phone, including the over 2,000 that I hadn't yet been able to transfer to my PC. I have no idea how or why this happened, but it seemed to coincide with the online browser becoming unresponsive - seems to have been some kind of glitch. The SD card has suddenly gone from showing 3.9/7 GB full to showing 116.5 MB full - those photos were pretty much all I had on the phone.
How can I recover these photos from SD card? Some of them are quite important to me. Please help. -Drive Paramedic
This is a latter from one of our customers. I think losing files from android SD card is a common issue during the process of transferring. I guess Drive is not the only one who encountered this. Don’t worry, there are plenty of ways to examine it ans see if any of the data is recoverable. With right tools, good care, and a little time, it is possible to restore the lost files on your Android SD card. This post will guide you get the way to do android SD card recovery and also some tips to fix a dead SD card.
How to Recover Deleted /Lost Files from SD Card Android
Step 1: Assemble Your Tools and Examine The SD Card’s Condition
- Connect the android to computer to make sure the SD card can be detected by computer. you may need some kind of USB cable that can help mount the card into and connect to computer easily. If the you can access the SD card on PC/Mac, then we can proceed to the next step.
- SD card just dead and cannot be identified? Try alternative SD card reader to see if it can be connected to computer. Otherwise, take out the card out from your Android, then take a look at the drive itself (pin bent)to check if it is damaged in any way. If the SD card is too physically damaged to attempt recovery, you may have to do more drastic measures that I will get to later. If everything looks good and it can be connected to computer systems, we can proceed.

Step 2: Grab Android Recovery Software & Connect the SD Card
Before getting started, keeps your anti-virus and antimalware tools launched, just to avoid the unnecessary digital disaster. Once you have done that, it’s time to download and install Android SD Card Recovery app. Here are two top software we’d like to recommend:
- Yolisoft Android Recovery(Android Recovery Mac). This is a powerful data recovery software which is specially designed for android users to recover lost files like photos, videos, audios, contacts, call logs, SMS, WhatsApp etc. from both internal memory and SD card. Personally speaking, Android Recovery makes data recovery simple and easy.
- File Recovery. The best android recovery alternative tools is File Recovery, it is available for both windows version and Mac version, which helps you recover deleted/formatted/lost files, emails, photos, musics, videos, etc. from Android SD card as well as PC hard drive, external storage medium.
Note:
Both tools can only exert themselves to recover files that haven't been overwritten by new content. Therefore, once you lost files, stop using the card and act fast.
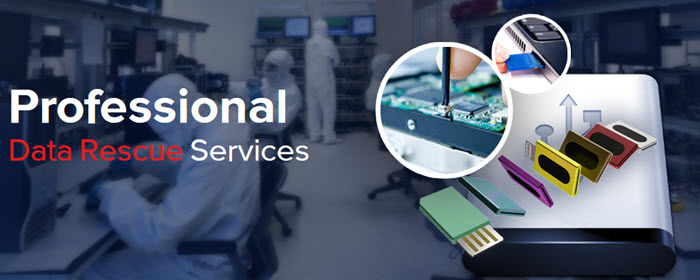
Step 3: Pick Up the Phone and Call Professional Firms for Help
For the Android sd card which is physically damaged and has been overwritten, the software can do nothing with it. You can consider professional data recovery services to see what they can do for you. As I known, DriveSavers, OnTrack, and it offers this kind of service. I have had good experience with it for Gopro video recovery, the DriveSavers and OnTrack are well known and loved, both companies do a superb job at pulling data even off of drives, SD cards that have been overwritten, formatted, or even severely physically damaged.
Note:
- Be ready to get out your wallet for the deep recovery for your damaged android SD card. The service for data recovery still cannot make 100% garauntee. Is the data worth that much?
- Make sure the data is backed up locally and online regularly, so that you can save lots of time for the damn recovery job and money.
Tips for Fixing a Dead Android SD Card
- Make sure the SD card is connected. Take the card out and put it back in. Then Restart to check if it can be connected.
- Put the card in another phone and try again.
- Scan the SD card for errors. On your computer, right-clicking on the SD card in the file manager, go to Properties > Tools > Error-checking > Check Now. Under Check disk options, select option “Automatically repair errors in the file system” , check box and click Start.
Related Articles:


